

Welcome to this video about the six-minute walk test. The primary purpose of the walk test is to evaluate a patient’s tolerance to exercise.
While the six-minute walk test was originally developed in 1963 by Balke for patients with cardiopulmonary disease, such as COPD, heart failure, interstitial lung disease, and pulmonary hypertension, its use has expanded.
The six-minute walk test is often used for functional testing for older adults, children with chronic disorders, and patients with orthopedic or neuromuscular disorders, such as Parkinson’s disease and multiple sclerosis. The test is also used to chart changes in condition and progress with physical rehabilitation, such as following a stroke, spinal cord injury, or other traumatic injury.
Preparing for the Six-Minute Walk Test
The walk test is usually carried out indoors on a hard flat surface, typically in a hallway that can be closed to passers-by. The recommended length of the testing area is 30 meters with cones or tape to mark the beginning and ending points and intervals marked every 3 meters, usually with tape.
The cones or markings are placed 0.5 meters before the beginning and ending points because the patient circles around them. The patient walks from one end to the other, back and forth, for 6 minutes.
Not all buildings, however, have 30-meter hallways or other open areas, so any area that can be measured and marked for distance can be used for the test, even outdoors. However, patients do tend to slow down at corners, so if the length of the testing area is too short, the patients may tire more quickly and cover a shorter distance.
In addition to the marked testing area, a wheeled chair that can be quickly moved should be available in case the patient needs to take a rest break. The examiner should also have the following equipment:
- A stopwatch or other type of timer
- A lap counter
- A blood pressure cuff
- A stethoscope
- A pulse oximeter
In addition to equipment needed for the test, resuscitative equipment must also be available and easily accessible. This is especially important for patients with cardiopulmonary disorders. Equipment includes a defibrillator, oxygen, and medications, such as sublingual nitroglycerine, aspirin, and albuterol. Examiners must be trained in basic life support and those testing cardiopulmonary patients trained in CPR.
Patients should be given information about the test and asked to wear comfortable clothing and walking shoes. Light meals are acceptable before the tests and the patient should avoid strenuous exercise prior.
Note that while treadmills have sometimes been used for the six-minute walk test, they may provide less accurate information about distance, and patients cannot adequately pace themselves, so they are not recommended.
It’s important that examiners are trained and follow the same protocol each time with every patient so that results are consistent and reliable.
Step 1
Once the testing area is prepared, the first step in the procedure for the six-minute walk test is to carry out a pretest assessment, including:
- Blood pressure
- Pulse
- Respiratory rate, AND
- Oxygen saturation level
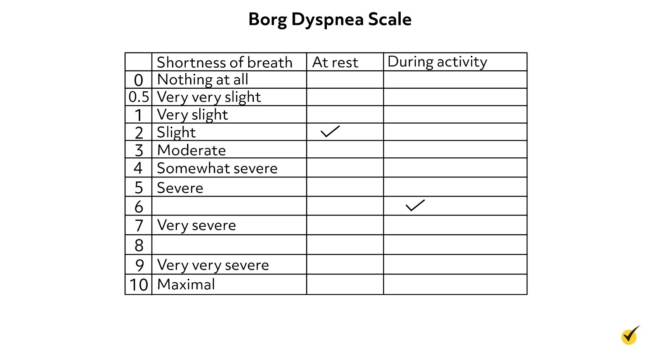
In some cases, the six-minute walk test is combined with the Borg Dyspnea Scale, which asks patients to assess their difficulty breathing on a scale of 0 to 10, with 0 being no breathlessness at all and 10 being maximal dyspnea. The patient should rate the level of dyspnea before starting the walk test and again after completing it.
Another assessment that is also sometimes included, especially for COPD patients, is the forced expiratory volume in one second (FEV1) with a spirometer.
Step 2
The second step is to explain the test, do a demonstration walking back and forth, and provide instructions to the patient. Instructions may vary somewhat depending on the purpose of the test and the patient’s underlying condition. General instructions include the following:
- While some healthcare providers may want the patient to walk as fast as possible during the test, in most cases, the patient is advised to walk at a comfortable pace.
- Patients should be reassured that they may feel tired or breathless during the test, and that this is normal.
- Patients should also be advised that if they feel too tired or breathless, they can lean against the wall or sit for a period to rest and then resume walking as soon as they feel able. The rest time is included in the 6 minutes.
- Generally, patients do not wear monitors during testing, but some patients, such as those with COPD, may be asked to wear the pulse oximeter to monitor oxygen saturation and pulse rate during the test and may be advised to rest if the oxygen saturation falls below, or the pulse rate increases above, a specified level. Nonetheless, keeping track of readings can be distracting.
- If time and the patient’s condition permits, one or two trial walks with an adequate rest period of at least an hour after the trials may be carried out before the distance is recorded.
- Those who walk with aids, such as a walker or cane, should use these aids during the six-minute walk test, and those who use oxygen should continue to use it during the test at their standard rate or as prescribed by the physician for the test.
Step 3
The third step is the actual walk test itself. The examiner positions the patient at the starting point and tells the patient when to begin and monitors the time with the stopwatch and the distance with the lap counter. The examiner must observe the patient carefully throughout the test for signs of breathlessness or other distress that may require intervention or a rest period.
The test should immediately be discontinued if the patient complains of chest pain, markedly increased dyspnea, or leg cramps, or if the patient appears pale and diaphoretic or unstable.
Studies have shown that encouraging patients increases the distance that they walk, so encouragement should be part of the protocol of informing the patient as each minute passes. For example, the examiner may say,
- “Well done, you have 5 more minutes to go.” OR
- “You’re doing well, you have 4 more minutes to go.”
- And so on until about 15 seconds before the end of the test, at which time tell the patient: “I’m going to tell you to stop soon. When I do, stop immediately where you are standing so we can measure the distance accurately.”
The examiner should generally not walk with the patient and should not lead the patient or use additional words or gestures to urge the patient to walk faster or further. If concerned about the patient’s stability, the examiner or another person may walk behind the patient.
Step 4
The fourth step is the post-test assessment which again includes:
- Blood pressure
- Pulse
- Respiratory rate
- Oxygen saturation AND
- The Borg Dyspnea Scale and/or the FEV1 if they are included in the assessment
Step 5
Finally, the examiner calculates the distance and offers fluids to the patient.
The score of the six-minute walk test is a reflection of the distance the patient walks during the test. This may vary widely depending on the patient’s age and underlying conditions. Most healthy adults can walk 400 to 700 meters in six minutes. Whether a score is negative or positive depends on the individual patient’s condition.
For example, for patients with pulmonary artery hypertension, a score of less than 300 meters is a negative indicator, while a score of greater than 400 is a positive indicator.
If using the walk test to assess progress, an increase or decrease of 50 meters is considered significant.
If the patient stopped before the six minutes elapsed, the examiner records the duration of the test, the distance walked, and the reason for stopping early.
Factors that can especially influence the distance patients can walk include:
- Age: Older adult patients tend to walk a shorter distance than younger adults.
- Gender: Males tend to walk about 60 meters more than females on average.
- Weight: Increased weight tends to result in decreased distance AND
- Height: Those who are taller tend to have a longer stride and can cover a greater distance.
Contraindications
According to the American Association for Thoracic Surgery, absolute contraindications to the six-minute walk test include unstable angina and myocardial infarction during the previous month.
Relative contraindications include:
- Tachycardia greater than 120 beats per minute
- Systolic blood pressure greater than 180 mmHg
- Diastolic blood pressure greater than 100 mmHg
The important thing to remember about the six-minute walk test is to follow protocol and to maintain consistency in the way in which the test is administered. The examiner must carefully observe the patient throughout the test and be immediately available in case the patient develops an adverse reaction, such as chest pain.
For most patients, the six-minute walk test poses little risk and can provide valuable information about the patient’s functional abilities.
That’s all for this review! Thanks for watching, and happy studying.